Vampire Bite Halloween Cupcakes
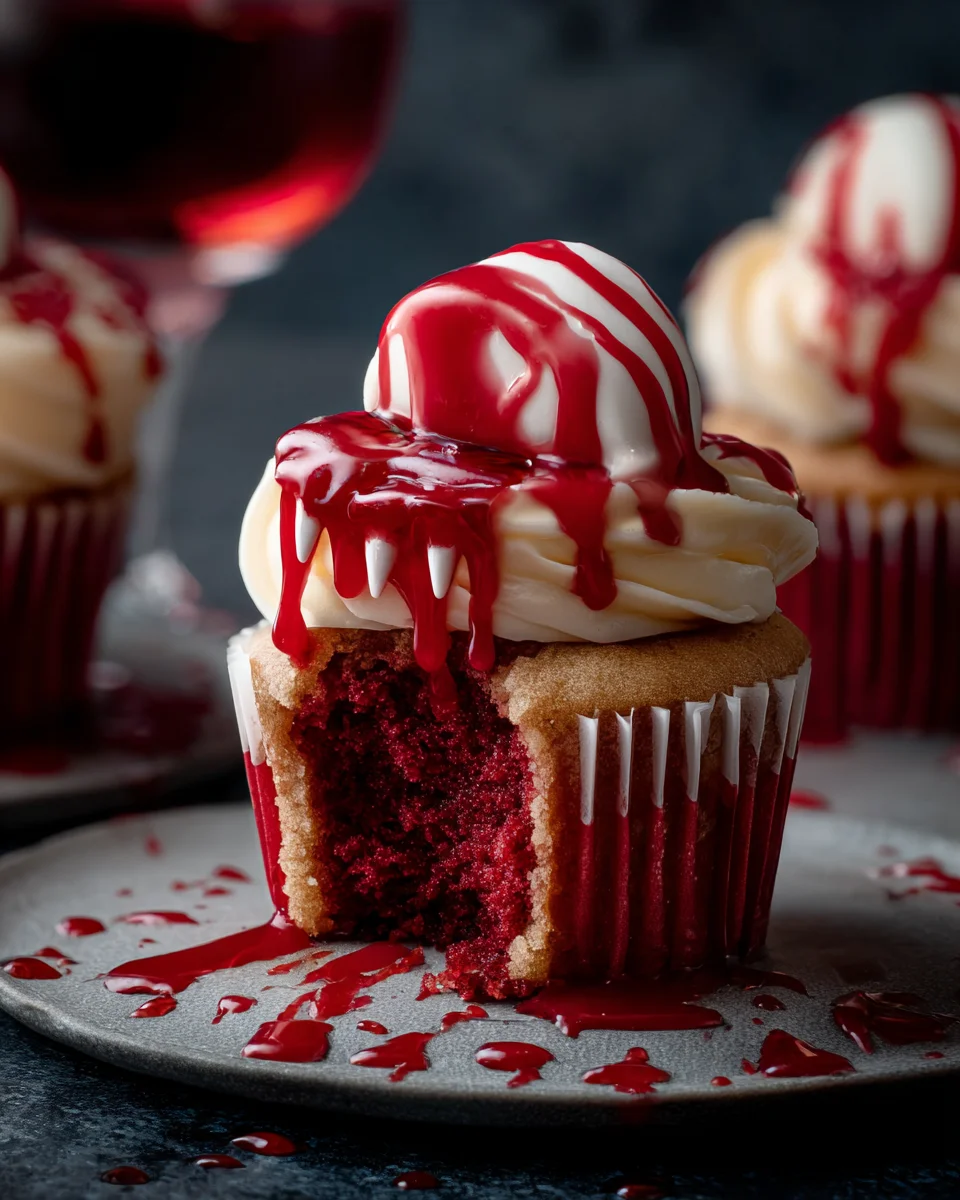
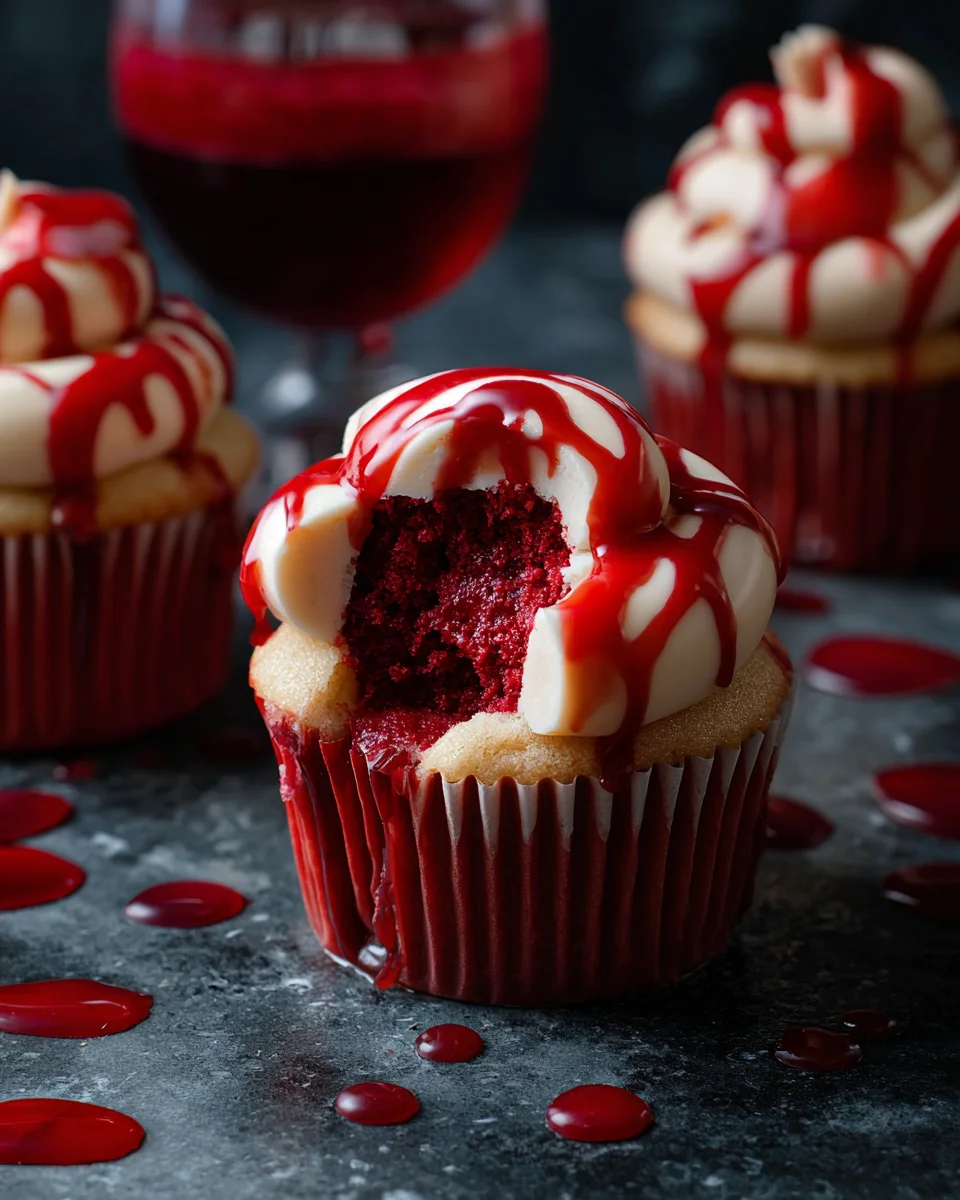
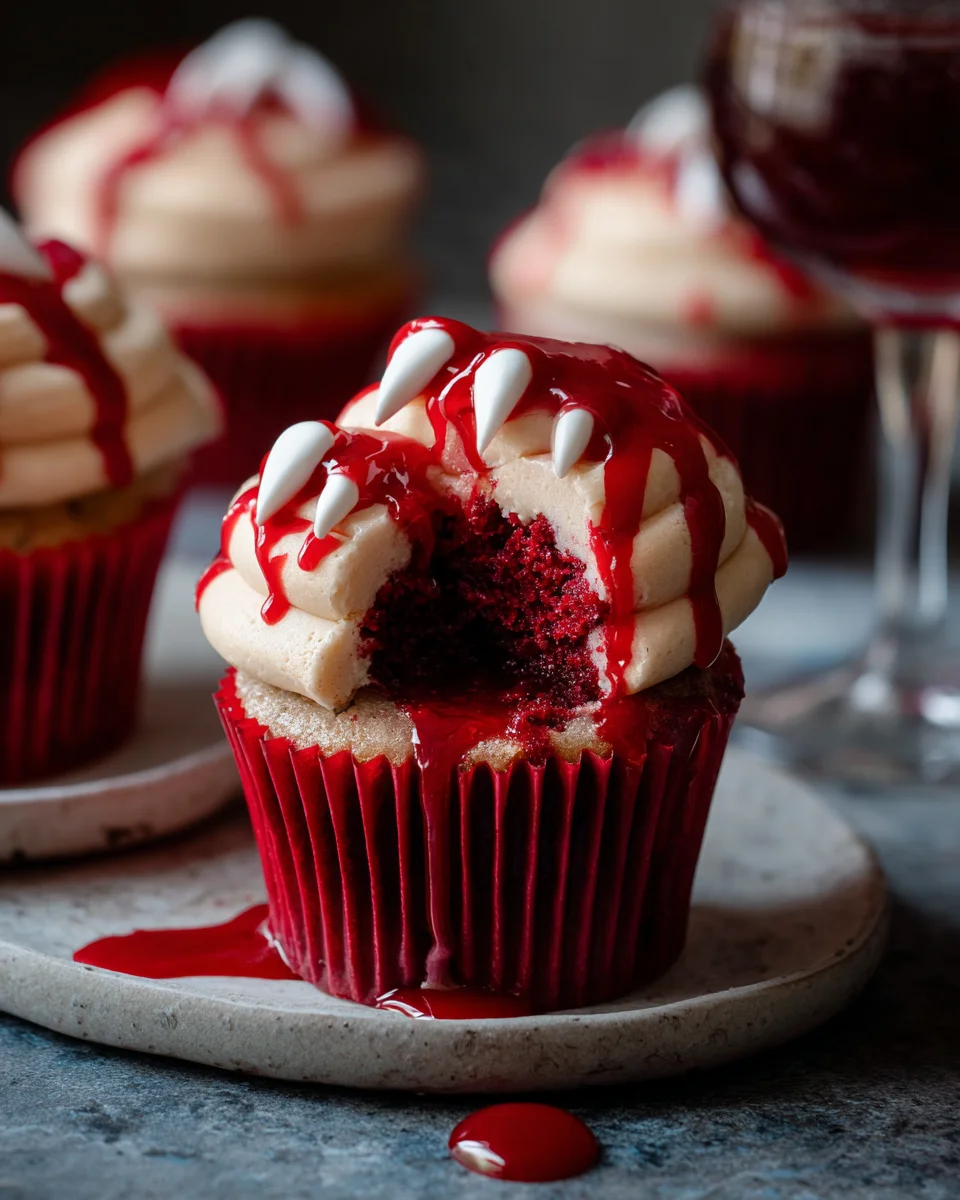
Vampire Bite Halloween Cupcakes are the perfect spooky treat for your Halloween celebrations. These delicious cupcakes are not only visually stunning but also packed with rich flavors that will delight both kids and adults alike. The vibrant red filling and creamy frosting make them stand out at any party, creating a memorable dessert experience. Whether you’re hosting a Halloween bash or simply want to indulge in festive treats, these cupcakes are sure to impress!
Why You’ll Love This Recipe
- Spooky Appeal: The unique vampire bite design makes these cupcakes a fun addition to your Halloween festivities.
- Delicious Flavor: With rich chocolate and red velvet elements, every bite is bursting with flavor.
- Easy to Make: The straightforward instructions make it simple for anyone to create these impressive treats.
- Versatile for Occasions: Perfect for Halloween parties, school events, or just as a fun baking project with kids.
- Customizable Decorations: Get creative with your decorations, allowing for personal touches and variations.
Tools and Preparation
Before you dive into making these enchanting Vampire Bite Halloween Cupcakes, gather your tools and prepare your workspace for a seamless baking experience.
Essential Tools and Equipment
- Muffin tin
- Paper liners
- Mixing bowls
- Whisk
- Spatula
- Piping bag or offset spatula
- Knife or cupcake corer
Importance of Each Tool
- Muffin tin: Essential for shaping and baking the cupcakes evenly.
- Mixing bowls: Necessary for combining ingredients without mess.
- Piping bag or offset spatula: Helps achieve a smooth frosting finish on each cupcake.
Ingredients
Ingredients:
– 1 1/2 cups all-purpose flour
– 1 cup granulated sugar
– 1/2 cup unsalted butter, softened
– 2 large eggs
– 1/2 cup buttermilk
– 2 tbsp cocoa powder
– 1 tbsp red food coloring (gel-based for vibrant color)
– 1 tsp vanilla extract
– 1/2 tsp baking soda
– 1 tsp white vinegar
– 1/4 tsp salt
– 1/2 cup red velvet cake crumbs (from the cupcake centers)
– 1/3 cup sweetened condensed milk
– 1 tbsp unsalted butter, melted
– 1-2 tbsp red food coloring (for a vibrant, glossy red hue)
– 1 cup unsalted butter, softened
– 3-4 cups powdered sugar, sifted
– 2-3 tbsp milk or heavy cream
– A few drops of ivory or peach food coloring (adjust for a pale, skin-tone effect)
– 1 tsp vanilla extract
– Candy fangs or small dots of red gelatin (for puncture marks)
– Red syrup or edible red gel (for blood drips)
– Straws (watch out – they are not eatable)
Grab This Chef Knife Now - Almost Gone!
- Stays Razor-Sharp: Ice-hardened blade keeps its edge longer than ordinary knives
- Superior Grip Control: Unique finger hole design gives you perfect balance and safety
- Built to Last a Lifetime: Premium stainless steel blade with elegant beech wood handle
Customer Reviews ★★★★★
How to Make Vampire Bite Halloween Cupcakes
Step 1: Preheat the Oven
Preheat your oven to 350°F (175°C) and line a muffin tin with paper liners. In a mixing bowl, cream together softened butter and granulated sugar until light and fluffy, about 2–3 minutes. Add eggs one at a time while mixing well after each addition. Stir in vanilla extract and red food coloring to achieve the desired hue.
Step 2: Mix the Batter
In another bowl, whisk together all-purpose flour, cocoa powder, and salt. Gradually add this dry mixture to the wet ingredients while alternating with buttermilk until just combined. Incorporate the baking soda mixed with white vinegar to help rise the cupcakes. Spoon batter into muffin tins filling each about two-thirds full.
Step 3: Bake
Bake for about 18–20 minutes or until a toothpick inserted comes out clean. Allow cooling in the pan for five minutes before transferring them onto a wire rack to cool completely.
Step 4: Prepare the Creamy Filling
Combine red velvet cake crumbs with sweetened condensed milk and melted butter in a small bowl. Stir until smooth; add more red food coloring as needed until achieving a glossy finish. The mixture should be creamy yet slightly runny.
Step 5: Hollow Out the Cupcakes
Once cooled, use a knife or cupcake corer to remove part of each center. Fill each cavity generously with the creamy filling.
Step 6: Make the Skin-Tone Buttercream Frosting
Beat softened butter in a large bowl until creamy. Gradually mix in powdered sugar one cup at a time along with vanilla extract and milk or cream until fluffy. Add ivory or peach food coloring for that pale skin-tone look.
Step 7: Frost the Cupcakes
Frost each cupcake using an offset spatula or piping bag to create smooth skin-like surfaces. For best results, chill frosted cupcakes briefly before decorating.
Step 8: Create the Vampire Bite Decoration
Create puncture marks using candy fangs or red gelatin drops on each cupcake’s surface. Drizzle red syrup from these marks down the sides of the cupcakes for that blood-dripping effect.
Final Touches
Arrange your eerily decorated cupcakes on a dark platter surrounded by additional syrup drips for added spookiness! Enjoy this enchanting dessert at your next Halloween gathering!
How to Serve Vampire Bite Halloween Cupcakes
Vampire Bite Halloween Cupcakes are perfect for any spooky gathering or Halloween party. These treats not only taste delicious but also make a striking visual impact. Here are some fun serving suggestions to elevate your Halloween dessert table.
Spooky Dessert Platter
- Arrange the cupcakes on a dark platter for a dramatic effect. The contrast between the pale frosting and deep red filling will catch everyone’s eye.
- Surround the cupcakes with edible blood drips made from red syrup to enhance the vampire theme.
Themed Drink Pairing
- Serve with a punch that features dark fruits, like black cherry or blackberry. This adds a thematic drink that complements the spooky vibe of the cupcakes.
- Consider adding dry ice for a foggy effect when serving, making it feel even more festive.
Halloween Party Favors
- Place each cupcake in individual clear bags tied with black ribbons for guests to take home. This keeps them fresh and adds a personal touch.
- Attach a small tag with a spooky saying or message to make it even more festive.
Table Decorations
- Use small plastic bats or spider decorations around the serving area to create an eerie atmosphere.
- Incorporate themed candles or lanterns that emit a soft glow, providing an inviting ambiance while keeping with the Halloween aesthetic.
How to Perfect Vampire Bite Halloween Cupcakes
To ensure your Vampire Bite Halloween Cupcakes turn out perfectly every time, follow these handy tips. They will help you achieve both flavor and presentation.
- Use room temperature ingredients: Make sure butter and eggs are at room temperature before mixing. This helps create a smoother batter and ensures better texture.
- Sift dry ingredients: Sifting flour and cocoa powder removes lumps and aerates them, leading to lighter cupcakes.
- Check oven temperature: Use an oven thermometer to confirm accurate baking temperatures. An uneven temperature can affect how cupcakes rise and bake.
- Cool completely before decorating: Allow your cupcakes to cool entirely before frosting. This prevents melting and ensures neat decoration.
- Experiment with food coloring: Adjust the amount of red food coloring in both the filling and frosting until you achieve your desired shade of red.
- Add extra decorations: Enhance your vampire bite look with additional edible decorations like candy eyeballs or chocolate shavings for added flair.
Best Side Dishes for Vampire Bite Halloween Cupcakes
Serving sides alongside your Vampire Bite Halloween Cupcakes can round out your menu beautifully. Here are some great ideas that complement these spooky treats.
- Witch’s Brew Soup: A warm, green soup made from pureed peas or spinach that looks magical on any table.
- Mummy Hot Dogs: Wrap hot dogs in strips of crescent dough to resemble mummies; bake until golden brown for a fun finger food.
- Monster Veggie Platter: Arrange assorted vegetables in monster shapes, using dips as “blood” for added fun.
- Eyeball Pasta Salad: Use pasta shaped like eyeballs (or meatballs with olives) mixed with colorful veggies for a festive side dish.
- Ghostly Mashed Potatoes: Shape mashed potatoes into ghosts using cookie cutters and add olive eyes for an eerie touch.
- Pumpkin Deviled Eggs: Add orange food coloring and paprika to deviled eggs; pipe them into pumpkin shapes for a seasonal twist.
- Creepy Cheese Board: Include different cheeses, crackers, and fruits arranged artfully as if they were parts of spooky creatures.
- Graveyard Taco Dip: Layer taco ingredients in a dish, topping it off with crushed chips for “dirt” and olives as tombstones for extra fright!
Common Mistakes to Avoid
When creating your Vampire Bite Halloween Cupcakes, avoid these common pitfalls for the best results.
- Overmixing the Batter: Mixing too much can lead to tough cupcakes. Mix until just combined for a light texture.
- Ignoring Cooling Time: Frosting warm cupcakes causes melty messes. Always let them cool completely before frosting.
- Using Low-Quality Ingredients: Cheap ingredients can diminish flavor. Opt for high-quality butter and cocoa powder for richer taste.
- Skipping the Filling: The creamy red velvet filling is essential for that “bite.” Don’t skip this step; it’s what makes them special!
- Neglecting Decoration Details: Details like blood drips elevate presentation. Take time to enhance your cupcakes with decorations for maximum impact.
Storage & Reheating Instructions
Refrigerator Storage
- Store in an airtight container in the fridge.
- They will stay fresh for up to 4 days.
Freezing Vampire Bite Halloween Cupcakes
- Freeze unfrosted cupcakes for up to 3 months.
- Place in a freezer-safe container or wrap tightly with plastic wrap.
Reheating Vampire Bite Halloween Cupcakes
- Oven: Preheat to 350°F (175°C) and warm for about 5-7 minutes.
- Microwave: Heat on low power for 15-20 seconds, checking doneness frequently.
- Stovetop: Use a skillet with a lid over low heat, warming for about 5 minutes.
Frequently Asked Questions
Here are some common questions about making Vampire Bite Halloween Cupcakes.
Can I make these cupcakes ahead of time?
Yes, you can prepare the cupcakes up to two days in advance and store them in the refrigerator until serving.
What if I can’t find red food coloring?
You can substitute with beet juice or pomegranate juice, but results may vary in color intensity.
How do I customize the filling?
Feel free to experiment with different flavors, like cream cheese or chocolate ganache, as a filling!
What other decorations work well?
Consider using chocolate syrup or edible glitter to add more flair to your Vampire Bite Halloween Cupcakes.
Are these cupcakes suitable for kids?
Absolutely! Just be mindful of any choking hazards with decorations like candy fangs.
Final Thoughts
These Vampire Bite Halloween Cupcakes are not only delicious but also perfect for making any Halloween celebration more exciting. Their unique spooky appearance will delight guests of all ages. Feel free to customize them further with different fillings or decorations to suit your party theme. Enjoy creating these festive treats!
Vampire Bite Halloween Cupcakes
- Total Time: 50 minutes
- Yield: 12 servings 1x
Description
Vampire Bite Halloween Cupcakes are the ultimate spooky treat that will elevate your Halloween festivities. With their rich chocolate and vibrant red velvet flavors, these cupcakes not only taste divine but also create a striking visual impact that is perfect for any celebration. Each cupcake features a creamy red filling, crowned with a pale skin-tone buttercream frosting, and finished off with playful decorations like candy fangs and dripping red syrup for an eerie effect. Whether you’re hosting a Halloween party or looking for a fun baking project to enjoy with the kids, these delightful treats are sure to impress both young and old alike!
Ingredients
- 1 1/2 cups all-purpose flour
- 1 cup granulated sugar
- 1/2 cup unsalted butter, softened
- 2 large eggs
- 1/2 cup buttermilk
- 2 tbsp cocoa powder
- 1 tbsp red food coloring (gel-based)
- 1 tsp vanilla extract
- 1/2 tsp baking soda
- 1 tsp white vinegar
- 1/4 tsp salt
- 1/2 cup red velvet cake crumbs (from cupcake centers)
- 1/3 cup sweetened condensed milk
- 1 tbsp unsalted butter, melted
- 1 tbsp unsalted butter, softened
- 3–4 cups powdered sugar, sifted
- 2–3 tbsp milk or heavy cream
- A few drops of ivory or peach food coloring
- Candy fangs or small dots of red gelatin
- Red syrup or edible red gel
- Straws
Instructions
- Preheat the oven to 350°F (175°C) and line a muffin tin with paper liners.
- In a mixing bowl, cream together softened butter and granulated sugar until fluffy. Add eggs one at a time, mixing well after each addition. Stir in vanilla extract and red food coloring.
- In another bowl, whisk together flour, cocoa powder, and salt. Gradually add to wet ingredients alternating with buttermilk until just combined. Fold in baking soda mixed with vinegar.
- Fill muffin tins two-thirds full and bake for 18–20 minutes until a toothpick comes out clean. Cool completely on a wire rack.
- Prepare the filling by mixing red velvet cake crumbs with sweetened condensed milk and melted butter until smooth.
- Hollow out cooled cupcakes and fill them generously with the creamy mixture.
- For frosting, beat softened butter until creamy; gradually add powdered sugar, vanilla extract, and milk until fluffy. Tint with ivory or peach food coloring.
- Frost cupcakes smoothly and decorate with candy fangs and red syrup drips.
- Prep Time: 30 minutes
- Cook Time: 20 minutes
- Category: Dessert
- Method: Baking
- Cuisine: American
Nutrition
- Serving Size: 1 cupcake (70g)
- Calories: 320
- Sugar: 24g
- Sodium: 130mg
- Fat: 14g
- Saturated Fat: 8g
- Unsaturated Fat: 5g
- Trans Fat: 0g
- Carbohydrates: 42g
- Fiber: 1g
- Protein: 3g
- Cholesterol: 45mg


